17 February 2011

Birthday Card - Football Hero

This one was a quick card to make... I made this one about a year ago!

Birthday Card
Again... I used a 13.5cm square card and covered the front with a green striped backing paper... the thinking was to resemble grass lines. lol

A "ribbon" border was made using football backing paper that I cut about an inch off. This was glued, a third from the top. Then I used a topper from the... It's A Man's World" collection I got with my Creative Cardmaking Magazine (Issue 15). I used the "Football Hero... The One And Only" which was already die-cut so I simply had to add to the "ribbon" border with foam tape.

The sentiment was added saying "Birthday BOY"... I would have preferred a Navy sentiment to tie in with the card but unfortunately I only had these gold ones at the time.

Cheers,
Lisamarie. x

Birthday Cards - My first attempts!

Okay... well today I'm going to show you my first attempts at card making!

BOB THE BUILDER Card...
Hand-drawn Bob the Builder Card
Bob the Builder... I hand drew this card for my friend's son. At the time they didn't have Bob the Builder cards and he was such a huge fan. I couldn't help but make one for him! This must have been about 10 years ago. lol.

********************************************************************************************************
KIPPER THE DOG Card...

Kipper the Dog
Fimo Card

Kipper... the dog! This card was made with Fimo clay. At the time, my daughter used to love watching Kipper. So I thought... why not have a go at making him. This was the result! I liked it so much... I never gave him away. lol.

NOTE: Not very creative with the card though... I just glued him to some foam that I found at the bottom of a strawberry punnet and mounted that to green card. Not even a sentiment! :-(

Ha Ha!!!

********************************************************************************************************
21st BIRTHDAY CARD...

21st Birthday Card

21st Birthday Card... I liked the square gems that I used to create the "21"... although the wire bending didn't go as I'd hoped. lol. Must remember... floral wire is NOT the best wire to use for this technique. haha! I added the sequin stars to the wire to kinda hide the forced "bends" that I had created.

The champagne bottle came out better than I hoped... and I personalised the label too. "CAT"... short for Catherine! Everyone called her Cat though!

...and I remembered to put a sentiment this time. lol

I think I've definately come a long way since I first started. :-D

Thanks again for checking out my cards!
Lisamarie. x

Stepper Card - Cricket Topper

Hello...

I recently made a stepper card for my friend's eldest son and I wanted to share it with you guys!

A5
Cricket Stepper Card

I started with an A4 piece of card that I scored in half. I had a Kanban Decoupage Sheet that had the cricketer on and cut one of them out in a rectangle... to use as my main topper! I then glued this to the front of my folded card. Using this as my guide, I simply cut from the fold down to the bottom... making sure I stopped about an inch from the bottom... I didn't want to cut the card in half! lol.

Then I decoupaged "the Cricketer and the Ball" by cutting around one of the remaining images and using some foam pads, I added these to the image on the topper... creating a 3D look.

I used the "ribbon" strip from my Kanban sheet and lined that up with the bottom... cutting the excess off.
Using a scoring tool and a ruler I scored a line just above the "ribbon" strip and repeated it the same depth above that. I turned the card over and repeated this on the back panel of the card. Then all that is left to do is drop the folded section down into itself to create the "stepper" element of this card.

NOTE: When scoring cards that are to be folded... always make sure you score the front AND back of each score line as this helps the card to bend and move rather than crack and tear!

I then covered the remaining white areas in a nice shiny blue paper... it would have been perfect to have put a scoreboard on here that had the personalised message on... however, I didn't have one so I simply added a gold "Happy Birthday" topper here instead.

The card was personalised with the recipients name on... using Anita's Alphabet Stickers in Gold!

An easy stepper card that is based on whatever size topper you use!

Thanks,
Lisamarie. x

15 February 2011

Baby Card - Giraffe Toppers

BABY CARD

This card is suitable for a Newborn Baby or even a Christening / Baptism card. Due to the two identical toppers it is also suitable for Twins!

It's not in the traditional pink or blue colour scheme but I find the lemon and lilac work well together.

The card is a 13.5cm square card (top fold) and cover it in lemon paper. I used my own Gingham paper (Design 8 / using Purple Colour J16) to cover the front, leaving a 0.5cm border around the edges. I then used a Dovecraft "Feet" punch to punch a row of feet along the bottom edge... allowing the colour beneath to show through... then I used a glue-stick to stick this sheet to the background.

Baby Card
suitable for: Newborn / Christening / Twins

I then used two "Giraffe" die-cut toppers that I received (from a freebie with Crafts Beautiful magazine). I cut a slit in each giraffe's mouth and using a "pillow" die-cut pre-printed with BABY on the front, I slotted this through their mouth... to give the impression they were holding the corners with their teeth! This topper was then placed on the front using foam pads!

A sentiment, personalised name... etc can be added either along the left or right side of the card... going from top to bottom. Add an insert... and your done! :-@

Let me know what you think... do you like it or not?

Cheers,
Lisamarie. x

Grey Valentine's Day Card

Hello...

I just wanted to share with you an alternative to the Girly Pink Valentine's Card I made recently.

A customer of mine wanted a few changes to my original Girly Valentine's card... such as Grey instead of Pink and an extra banner personalised with his girlfriends initials on.

This was the result...


I didn't have a large heart jewel... so I used a silver heart sequin instead. Also I used silver mirri card under the ribbon instead of a grey card and it gave it a more metallic look to the ribbon.

Not as "Girly"... but still quite tasteful! The insert was personalised with a special message to his Valentine! <3

So... let me know... which one do you prefer... the pink or the grey version?????

Lisamarie. x

Girly Pink Valentine's Day Card

Sticking with the girly theme for Valentine's Day... I then made this one... which came out better than I thought! :-)

Take a 13.5cm square card and place the fold at the top. Then cover the front in cerise paper. Take a 12.5cmx7cm rectangle of baby pink paper and glue in the top panel of this square. Leaving a border around the edge.

Then I cut a 1cmx12.5cm strip of cerise card and tape some ribbon to this. I then created two loops of ribbon (one larger than the other) and glued (using pinflair glue) the centre of the smaller one onto the centre of the larger loop. Then taking a smaller piece of ribbon I then wrapped the ribbon around the loops and then I cut another piece and folded it in half to create the "V" and snipped the ends at an angle and glued this to the back of the squashed loops. To hide the pinflair glue I then glued a silver heart jewel over the top! Perfect!!!

Now cut a piece of Cerise patterned paper... I chose this pretty flowery paper! Glue this to the bottom section of the card, allowing for the border around the edges... then tape the ribbon strip half way between this patterned paper and the plain paper to hide the join.

Cut two hearts out of baby pink glitter paper and mount onto cerise card and cut these out, leaving a thin border. Using pinflair glue, glue one heart slightly onto the other... in a staggered layout! Add a sentiment banner to the front with pinflair glue, to raise the sentiment... and adhere it to the glitter. Here I used "BE MY VALENTINE". Then glue these to the top right corner... making sure you have a slight gap between the hearts and the bow!

All that was left to do was glue cerise jewels to the corners.... for a bit more girly bling... and the card was done!

NOTE: Insert to be placed inside... at a later date... depending on the wording required by the customer!

There you go... yet another GIRLY VALENTINE! :-)

Lisamarie. x

PS: For a slightly alternative view of this card... click HERE!

Pink Valentine's Day Easel Card

Okay... well I've made a Masculine Valentine's Card and a Masculine Easel Card... now I wanted to make a girly Valentine's Card... so I decided to go with PINKS!!!!

I started with two 5x7" cards. I took one and cut it in half. (I only needed one half for this so the other half was put away) and with the second card open I folded the top half into the middle so it was halved again. (This creates a "tent" effect to the top of the card).

With the base (the one we folded in half) card I opened it to reveal the inside... I then glued a baby pink rectangle of paper inside, allowing for a 1cm white border around the outside. Then cut a 4cm square out of cerise card and round the corners off. Then punch the card using the "Dovecraft's" double-heart punch and glue to the bottom corners of the pink paper... leaving a 0.5cm border along the edge. Then take a sentiment... I chose "I Love You!" in white text on a bubblegum pink background and mounted this to white card and mount again to a cerise card. Then add foam-pads to the back to raise it from the card... this acts as a stopper for the easel... when left open!

Valentine's Day Easel Card
... very Pink and Girly!!!

Now take the 5x7" piece of cut card... we're going to decorate this now... I placed baby pink and cerise paper (18x7cm) together and cut a swirl pattern from them both. With the cerise piece, I then cut a 1cm strip from the straight section along the bottom and glued this to the pink piece. Then I glued this to the 5x7" piece of card. I stamped "sweetheart" onto the cerise paper and glued silver heart jewels around it... a girls gotta have some bling eh? lol

Then I cut out two hearts from cerise and baby pink glitter paper and glued these to the front... in the dip of the swirl! I had a banner with the words "BE MY VALENTINE" on and I raised these above the glittered heart using Pinflair glue (I find Pinflair glue is the ONLY glue that sticks to glitter card/paper). Cerise heart jewels were then glued to the top right corner to balance the gems along the bottomright.

NOTE: I think it still works okay... although I might need to invest in a bendy ruler to get a neater effect with the swirl as that didn't look very neat to me! :-(

5x7" Girly Valentine's Day Card

If you don't like the easel cards... then this design still works as a traditional 5x7" card.

Lisamarie. x

Multiple Hearts Card

Another quite simple card that can be used for ANY occasion... Valentine's Day, Birthdays, Thanks, Thinking of You... etc.

This is quite a bright card due to the colours used... but it would make a nice alternative to the traditional red / black / pink used for Valentine's Day.

I used a square card... then I covered the front with a 13.5cm piece of turqouise paper. Then I added a 13cm piece of white paper on top.

Four square pieces of paper (4cm) were then cut out of some bright zesty paper in... orange, yellow, lime green and bubblegum pink. These were glued, leaving a 1cm border in the centre to create a small cross in the centre of the card.

(This centre strip can be used for adding a Sentiment if you wish)

Multiple Hearts
(...NOT just a Valentine's Day card)

Then four hearts were cut out of patterned paper... making sure I stayed with the four colours used in the back panels. Then using foam pads stick these on alternate squares (making sure you have a different colour in the heart than you've used in the background).

Again... plain and simple but still has quite an impact!

Lisamarie. x

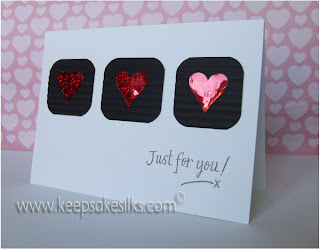
Heart Card... Just for You! x

Hello again...

I have some Heart Cards that I made recently that are quite plain... the first one is here and the other one can be found here.

These can be used for "Valentine's Day"... or "Just Because"... or "I'm Thinking of You" ... or "I Love You"... whatever the occasion then these cards will work for either!

This card is made using an A6 Card and has been stamped with the words "Just for you! x"... obviously I can change the text to whatever you require.

The three panels are black card squares that have had the corners rounded off and then run through a "ribbler" machine to create the corrugated look. I then used Pinflair glue to adhere these to the card... starting with the two outside cards and lining the middle one up so the spacing was even.


Just for You! x 
(...and NOT just for Valentine's Day!)
Then I cut out three hearts in red holographic vinyl and used my pinflair to stick these to the ridges on the black card.

Quite a plain and simple card... but it works!

The hearts can be replaced with ANY embellishment... so this layout can be used for a New Baby, Birthday or any occasion... depending on the topper used!

Quick and easy card and only took a short time to make!  ...from £2.50

Lisamarie. x

11 February 2011

Valentine's Day Shaker Card

Hello again...

I had a go at making my first shaker card. Sticking with the Valentine's Day theme, I took a 13.5cm square card and mounted a black 12.5cm square inside...

I then cut out a 12cm piece of red card and mounted a 11cm piece of white paper on top. This white panel was then stamped using Papermania's Red Ink and a "5 mini hearts" stamp was stamped across (in rows and columns) it. I recently brought a nice red 1cm ribbon that was pre-printed with the "<3 Happy Valentine's Day <3"  on it... in pink. So I used this to break up the top. I stuck it to the white/red card and then adhered this to the base card. I then used a pre-printed Sentiment banner (to tie in the pink section in the ribbon) which I then put on foam pads and placed across the top.


To make the shaker panel... I cut a heart out of black glitter card and stamped a teddybear image onto paper. After colouring in the bears I then cut them out. I took a 7cm piece of black card and stuck a 6.5cm piece of red card on top. I then drew in red felt-pen a "xoxoxox" pattern across the background, alternating the design with every row. Then I glued the heart and teddybears onto the background using Pinflair glue.

I then cut a 6.5cm square out of another piece of card and cut a 5.5cm square from the middle. Then I taped some acetate to the reverse and mounted shaker tape foam (thick foam tape) all around the edges. (making sure not to allow any gaps). I then coloured the inside of my foam tape with black felt-pen and the outside with red felt-pen to remove the starkness from those white foam tapes. Then I sprinkled about 30 red and pink confetti hearts (sequin hearts) onto the bears before removing the tape backing and sticking down the frame.

Close-up view of Valentine's "Shaker" Card

So... what do you think?

NOTE: The problems I had with making this card were as follows:
  1. I had never used Pinflair's ink before and unlike the Whisper's inkpad this one was tacky and wet and smudged slightly as I adhered it to the red card.... so next time, I'll simply leave it to dry first! lol
  2. The shaker card panel... I used Pinflair glue gel to stick the bears and heart to the base card and unfortunately didn't allow it time to dry before adding my confetti... so quite a few got stuck to the sides and I had to use a pin to push through the foam and gently remove them.
  3. Therefore.... I MUST remember to leave things to DRY first!!!!!!  Opps! haha!!!
So there you go... another Valentine's Day card!

Cheers,
Lisamarie. x

Masculine Valentine's Day Easel Card

Hello again... last night I carried on the Masculine Valentine theme and made an Easel card. These are soooo easy to make and give an extra dimension to your traditional cards.


I started out with a 13.5cm square card blank... (I use Anita's Quality Square Card and Envelope pack). Fold in half and score. I took another card and cut along the score line to give me two square panels. Discard one half... to be used another time!

Now take your square card blank and decorate the bottom half in black paper. Place grey stripe paper on the top half. (I used Dovecraft's 8x8 Designer Paper Pack "Charcoal Prints" - DCDP08). I cut a piece of the stripe to create a ribbon border. Then cut out a heart shape in this paper and mount it onto black card, then cut around it again to create a thin 2mm border. This heart was then placed exactly in line with the piece behind it to make it like a 3D effect. I used Pinflair glue to raise it from the background.

I then stamped the greetings onto white card and mounted onto black card with a thin border. These were then raised from the card using small square foam pads (I used my Whispers Black ink and Studio G Alphabet Stamp set for the words)... as it's hard to see where I stamped, due to the dowels on these stamps, I ended up with uneven text... but I think that added to it's charm! :-)

Now take your folded card and fold the top piece in half and score it. (Fold it into the centre of the card so it looks like a tent-fold or mountain-fold). Decorate the inside of this folded card... I cut the stripe paper into strips and mitred the corners and glued these around the edge of the bottom panel to create a frame.

Then I cut out two hearts in black card and placed foam tape behind to raise it off the base card. This is what allows your card to stand up in the Easel position. (I used Dovecrafts Designer Clear Stamps "DCRS88" using the "<3 YOU" stamp) adding a sentiment to the base so that it can also be viewed when the card is in the Easel position.

Take the top panel and tape it to the top quarter of your folded base card. This is the part of the card that is nearest you on that tent fold... NOT the one that is nearest the score line in the middle of the card.

NOTE: You can check you've got it in the right place before you remove the double-sided tape's top cover! It should fold flat to look like a regular card but when the recipient opens the card they simply rest it against the "heart" stoppers.  I do hope this makes sense!!!!!


This picture above shows how this card would look if you just turned it into a regular Square card... still has all it's charm but slightly less impact than the Easel card... I think!

Anyway, thanks again for checking out my cards and I hope you come back again soon to see what else i've made.

Cheers,
Lisamarie. x

10 February 2011

Masculine Valentine's Card

Hello... today I wanted to have a go at making a card for Valentine's Day. I kept seeing posts on how hard it is to make a Valentine's Card for Men... so I wanted to give it a go!

What do you think? Would you give this to the man in your life?


I started out with a 13.5cm Square Card... already pre-scored Then I glued a silver backing paper to the front. I then cut out a 12.5cm x 7.5cm piece of black card that I stamped the message "Happy Valentine's Day" in chalk... why chalk? Well I wanted to use my new Uni-ball Signo broad White pen... so I chalked up my stamp and used that to create the outline for me to trace. I'm sure it would have just been easier to hand-write the text... but I don't have neat enough handwritting for Script text. I then cut out another 12.5cm x 7.5cm piece of backing paper (from my own backing papers - Design 106 ). I cut a 12.5cm x 1cm strip of black card and taped some ribbon to it. (I used this strip as it takes the sheer look away from the ribbon and boosts it's colour). I used double-sided tape to adhere the ribbon panel to the black card and stuck this below the swirly patterned paper. I cut out a heart from Black Glitter Card and used Pinflair glue to raise it from the background... whilst sticking it to the ribbon. To make the screw heads I simply punched out 8 circles from Silver Mirri Card. The fiddly part was taking 4 of these and cutting a tiny strip (about 1mm) from the centre of each and then used a glue stick to glue the two halves to the outside of the uncut circles... creating a fake screw! It looked pretty cool! :-)

So... what do you think of my first card? All feedback is appreciated!

Thanks,
Lisamarie. x

PS: If you are interested in purchasing this card... email me (see my website)... £4.00 (p&p extra) via PayPal

Welcome to Keepsake Silks

Hello... my name is Lisamarie Howard and I run my own business called Keepsake Silks.


I am a graphic designer that makes my own hand-made cards... (which I shall post regularly on here), along with Wedding Stationery and Scrapbooks. I've taught myself how to create my own website www.keepsakesilks.com from scratch, so I can showcase my products. I have even designed items for CraftRobo Cutting Machines, Scrapbooks and Card Making.


My website offers lots of helpful hints and tips... plus you will also find the following products that I have created myself... 


KEEPSAKE: Backing Papers, Envelopes, Folders, Wallets, Pockets, Boxes, Bags, Photo Mounts, Frames, Card Blanks, Party Items, Bookmarks, Tags, Alphabets, Numbers, Borders, Shapes, Words & Text... suitable for your Card Making & Scrapbooks. Plus I can make templates for your CraftRobo and similar cutting machines that use the following files...( .gsd / .cdr / .dxf )


SILKS: Cushions ( Pillows ), Paintings, Boy's ties, Headbands, Clips, Cards, Lavender Bags... and loads more

ALL Designs in the KEEPSAKE section are available in ANY Colour. We have 9 colours (White, Black, Brown, Red, Orange, Yellow, Green, Blue, Purple and Pink) that are available in 22 shades... each shade has a further 10 tints available... meaning we have A LOT OF COLOURS!


Whatever you are looking for... even if it's something specific or you can't find what you need... then let me know... I can make most things from scratch... why not email me your requirements and i'll see what I can do for you. (I only accept PayPal payments... via PayPal's invoice!)

Anyway, thank you for taking the time to check out my blog and I hope you will like the handmade cards that I shall be posting on here. :-)